Setting Up Multi-Factor Authentication (MFA)
CampusLogin has added Multi-Factor Authentication (MFA) to the platform for added security at your school. When your staff logs in to CampusLogin, you can set it up so that when they log in they are prompted to enter a security code that will be sent to their personal email or cell phone (by text message). We highly recommend enabling MFA at your school to increase
security and help protect your CampusLogin accounts.
The setup for MFA only needs to be done once but requires two steps: pre-enabling MFA and then, eventually, fully enabling MFA.
Pre-Enabling Multi Factor Authentication
The Paused/Pre-Enabled level will allow you to start collecting emails and phone numbers from your staff without activating MFA yet. It is recommended that you set MFA to Paused/Pre- Enabled 1-2 weeks before you want to fully launch MFA.
To activate the Paused/Pre-Enabled MFA level:
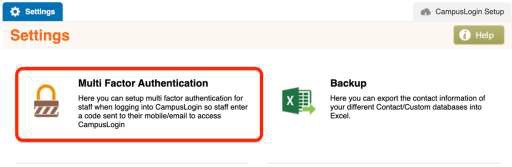
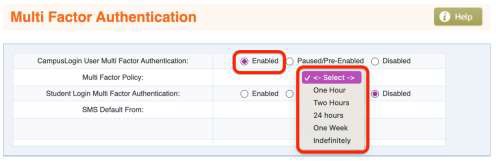
1. In CampusLogin, go to School Settings.

2. Click Multi Factor Authentication from the setting tools.
3. Next to CampusLogin User Multi Factor Authentication click the radio button for
Paused/Pre-Enabled. Do not do anything with the Student option right now.
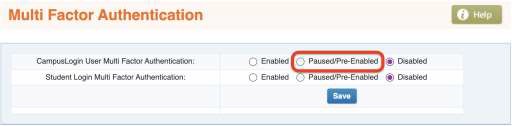
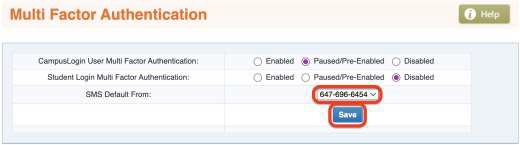
4. After clicking the radio button, a new row will appear titled SMS Default From. Here, you must select the phone number that authentication text messages will be sent to users from. Note: you should use a phone number that is assigned to IT or leadership, or provision a new phone number. You should not be using a phone number that is used to communicate with leads/students.
5. Click Save.
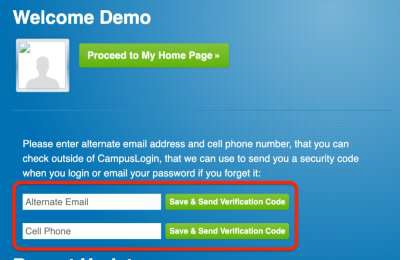
6. Now, when a user logs in, the system will check to see if the user has the MFA
information already added. For those that do not already have a cell phone number or alternate email the system will prompt them to add them.

Enabling Multi Factor Authentication
After your staff have had a chance to enter their alternate email and/or cell phone number you can switch the MFA status to Enabled. At this point, depending on your policies that you set, users will be prompted to enter a code that is sent to their chosen email/cell phone when
logging in to CampusLogin. To set your MFA to Enabled:
1. In CampusLogin, go to School Settings.
2. Click Multi Factor Authentication from the setting tools.
3. Next to CampusLogin User Multi Factor Authentication click the radio button for
Enabled.
4. Select your Multi Factor Policy from the dropdown menu that appears. This policy will tell the system how often they should be sending a code to the users of CampusLogin (i.e. how long before the system will use MFA again). Note: We do not recommend
setting the policy to Indefinitely as it will lessen the security purpose of the tool.
5. Click Save.
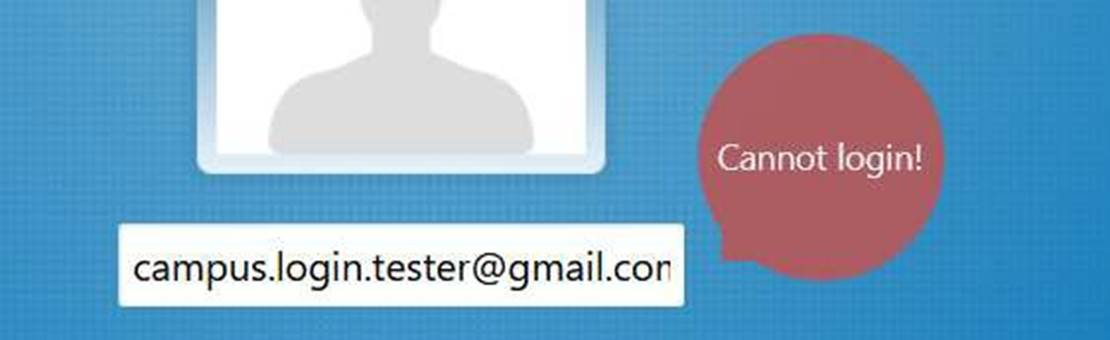
6. If a user’s alternate information has been entered, they will be sent a code to their email/by text that they must enter when logging in. However, if a user’s information has not been added to CampusLogin, when they try to log in they will receive an error saying ‘Cannot Login!‘. This is an indication that their alternate email/cell phone number
needs to be added manually in CampusLogin and they should contact their internal manager to add their information.
Adding a User’s MFA Information Manually
If MFA has been Enabled, but a user has not had their alternate information added to CampusLogin yet, they will not be able to log in. However, their details can be added manually to give them access. Please note: If MFA is enabled on your Staging site, it will also be automatically enabled on your Live site.
To add a user’s alternate information:
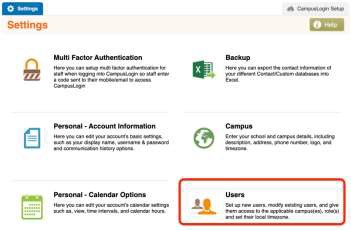
1. In CampusLogin, go to School Settings.
2. Select Users from the tools.
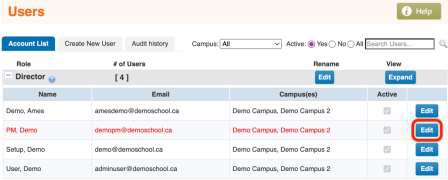
3. Find the user you need to add information for and click Edit beside their account.
4. Click the checkbox for Contact Information in their user profile.
5. Add the Cell Phone and Alternate Email.
6. Click Save.
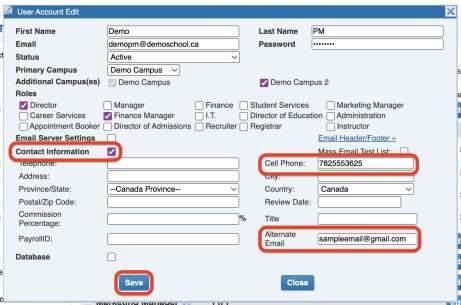
7. The user will now be able to be sent a code to their email/by text and log in using MFA.